7.21.2026

Final Chapter of Marineland

When Marineland of Canada effectively shut its doors to the public after the 2024 season, it marked a profound turning point in the conversation surrounding large animal welfare. For decades, the sprawling Niagara Falls tourist attraction was a fixture of summer road trips. But behind the cheerful jingles and concrete stadium seats lay a grim reality for the marine mammals and wildlife confined within its gates.

Today, that chapter is finally reaching its conclusion—not through natural transition, but through a high-stakes, international emergency rescue.

A Troubled Legacy Behind Closed Doors

For years, former trainers, activists, and animal welfare organizations raised alarms about the conditions at Marineland. The park's business severely declined, driven by mounting controversies that ultimately forced its collapse:

  • Severe Animal Welfare Violations: Since 2019, at least 20 whales—including 19 beluga whales and the park's final, lonely orca, Kiska—died at the facility. High-profile whistleblowers exposed deteriorating infrastructure and terrible water quality that reportedly caused blindness, chemical burns, and severe distress. Additionally, the park was convicted of failing to comply with animal welfare orders regarding substandard enclosures for its black bears.
  • Legislative Pressure & Public Backlash: In 2019, Canada passed Bill S-203 (the "Free Willy" Law), criminalizing the breeding and new captivity of whales and dolphins. Coupled with viral footage of animals displaying extreme psychological distress, public protests soared, and visitor admissions flatlined.
  • Financial Collapse: By 2024, the heavy financial toll of ongoing investigations, lawsuits, and a crumbling visitor base left the park unable to afford its massive overhead costs.

The Aftermath: Facing the Threat of Euthanasia

The closure of an entertainment facility does not magically erase the lives affected by it. Left stranded with dozens of belugas in deteriorating conditions, the park faced severe financial strain—even threatening euthanasia if government funds or export approvals weren't met. An initial attempt to ship the remaining pod to China was blocked by the federal fisheries minister, leaving the animals in administrative limbo.Fortunately, a coalition stepped up. Following a rigorous approval process by U.S. and Canadian authorities (including emergency import authorizations from NOAA), a consortium of AZA-accredited institutions joined forces to execute an unprecedented rescue mission.


The Journey to Safety: A New Beginning at Accredited Sanctuaries

The logistics of moving marine mammals that weigh thousands of pounds across international borders are staggering. The operation requires specialized water-filled containers, mobile cranes, flatbed transport trucks, police-escorted convoys, and climate-controlled aircraft monitored constantly by veterinary and aquatic medicine specialists.The first wave of this historic rescue is officially underway:

  • Shedd Aquarium (Chicago, IL): Shedd welcomed its first pod of four female belugas—Acadia (27), Osiris (26), Sierra (26), and Lillooet (21)—after a safe journey across the border. Kept together as a bonded sub-group to minimize stress, these whales now have access to the 3-million-gallon Abbott Oceanarium, complete with expert round-the-clock medical care, clean water, and diverse nutritional options. Shedd has committed to providing a lifelong safe haven for up to 10 of the rescued belugas.
  • Global Network of Care: Additional survivors are being welcomed by accredited partners including SeaWorld San Antonio, SeaWorld San Diego, Georgia Aquarium, and international partner OceanogrĂ fic València in Spain.

Moving Forward: What We Can Learn

The fall of Marineland and the subsequent emergency rescue of its remaining belugas is a monumental milestone. It signals that public appetite for utilizing large, sentient animals for commercial entertainment has fundamentally ended.
When entertainment institutions fail, the responsibility falls back on the global community of science, conservation, and accredited sanctuaries to step up. True appreciation for aquatic wildlife comes from natural observation, conservation science, and respecting their environments—ensuring that the lessons learned from Marineland's downfall guide us toward a more compassionate future.


The Hard Truth About "Sanctuary": Life After Marineland

When a crisis like Marineland happens—where a facility collapses, funds run dry, and the alternative is catastrophic abandonment or potential euthanasia—animal welfare advocates and regulatory bodies are forced into a corner. Traditional aquariums are virtually the only entities with the multimillion-dollar veterinary transport infrastructure, specialized aquatic medicine teams, and massive pool systems required to take in dozens of heavy marine mammals on short notice.

So, are they "sanctuaries" in the purest ideological sense? No. They are permanent institutional homes. For these specific Marineland survivors, moving to an accredited aquarium means escaping a deteriorating, lethal environment and gaining round-the-clock medical care—but it also means remaining part of the captive display system. It highlights the deeply complex, often heartbreaking compromises that have to be made when human-animal management systems fail.

5.28.2026

When Water Changes Backfire

For years, I operated under the assumption that a massive water change was the ultimate safety net for a small setup. In my old 30-gallon setup, I was performing massive 75-90% water changes every single week. I matched the temperature to within 3-5°F. I had high-end filtration. I thought I was providing the ultimate environment for my ranchu goldfish.

Instead, my fish started showing bright red "blood splotches" under her scales—symptoms of Hemorrhagic Septicemia.

I was doing everything "right," so why was my fish suffering? The answer was in the "reverseness" of my maintenance. I wasn't dealing with a dirty tank; I was dealing with Osmotic Shock.

Technical Breakdown

My house at the time ran on a highly filtered well system with a salt softener. By swapping out 90% of the water at once, I was inadvertently creating a "chemical roller coaster":

  • Mineral Stripping: The water softener traded the Calcium and Magnesium my ranchu needed for Sodium ions. A 90% change essentially "reset" the mineral balance too fast for the fish to adapt.
  • Capillary Blowout: Goldfish have to constantly regulate the salt levels inside their bodies versus the water outside (Osmoregulation). The massive shift in water chemistry caused her internal blood pressure to spike, literally bursting tiny capillaries under her skin.
  • The "Clean" Stress: Even though the water looked crystal clear, the lack of "aged" stability was physically bruising the fish from the inside out.

The "Perfect Stats" Illusion


The most frustrating part was that my water tests came back "perfect." My Ammonia, Nitrite, and Nitrates were all fine. On paper, I was a model fishkeeper, but standard test kits miss the two invisible factors that were actually hurting my ranchu:
  1. The TDS Gap: Total Dissolved Solids measure the "weight" of the water. My tank water was "heavy" with minerals and age, while my filtered well water was "light" and stripped. A 90% change caused a massive density shift that her body couldn't handle.
  2. The Softener Trap: My pH was stable, but my GH (General Hardness) was likely bottoming out. My softener was trading essential minerals for Sodium, leaving my fish with "empty" water that couldn't support her internal blood chemistry.

The Protocol Shift

If you are seeing red streaks or "bruising" despite a rigorous cleaning schedule, you might be over-maintaining. Here is how to adjust:

  1. Stability over Volume: Move away from the "Massive Reset" and toward smaller, more frequent changes (25-30% twice a week). Pro-Tip: Always "top off" evaporated water with fresh water before starting your water change. This resets the mineral concentration first, preventing "TDS Creep" and ensuring your actual water change doesn't cause a chemical spike.
  2. Mineral Awareness: If you use softened water, you must remineralize. Fish need those "hard" minerals for their slime coats and scale integrity.
  3. Know Your Source: Test your tap water vs. your tank water. If the pH or TDS (Total Dissolved Solids) gap is huge, a 90% change is a shock, not a cleaning. For goldfish, generally anything over 0.5 to 1.0 units is considered a high-risk gap. If your tap and tank differ by more than 0.5, you should stick to 20-30% changes to keep the "swing" within a safe, unnoticeable range for the fish.
Remember: A 1.0 pH jump means the water is 10 times more alkaline/acidic!

The Takeaway: In a smaller tank like a 30-gallon, consistency is more important than "perfection." Sometimes, being a "helicopter fish-parent" can do more harm than good. 

The Breeder's Myth: "More water is always better." A common trap for new keepers is seeing breeders perform 200% water changes and thinking, 'If they do it, I should too.' What they don't tell you is that they are using continuous drip systems where the water parameters never change. Furthermore, breeders do this specifically to eliminate growth-inhibiting hormones that accumulate when keeping a large number of fish in close quarters. If you try to replicate this by manually dumping 100% of your water, you aren't "breeder-level" cleaning—you are creating a chemical disaster. Stick to your 25–30% routine and keep your stability. 

Technical Glossary

  • Hemorrhagic Septicemia: Often a result of physiological stress, this manifests as bright red streaks or "blood splotches" under the scales. It is essentially a vascular failure where capillaries burst due to the "chemical whiplash" of unstable water. 
  • Osmotic Shock: This occurs when a sudden change in the concentration of dissolved substances (like salts and minerals) forces a fish's body to rapidly recalibrate. This physical trauma disrupts how a fish regulates its internal fluids, leading to extreme stress or vascular collapse.
  • Osmoregulation is the active process by which an organism maintains the balance of water and electrolytes (salts/minerals) in its body. In the aquarium hobby, understanding this is critical because fish are constantly "fighting" their environment to keep their internal chemistry stable. If the water chemistry outside the fish shifts too fast, their osmoregulation system fails, leading to the Osmotic Shock we discussed earlier.

5.19.2026

Ultimate Fish-Safe Glass Cleaner

This has been my preferred all-natural glass cleaner for years. I’ve seen plenty of DIY window cleaners that rely on alcohol, but I’ve never liked the idea of those fumes being anywhere near my fish. I also stay away from using vinegar on aquarium glass because it can eventually eat away at the silicone seals—a risk that isn't worth taking. 

Instead, I use black tea. It provides the acidic pH needed to cut through film and water spots, but it’s a much more natural alternative. It reminds me of a blackwater habitat, so I don't have to worry about it affecting the silicone or the tank's long-term integrity.

Why skip the Vinegar and Alcohol?

  • Silicone Integrity: Regular use of vinegar (acetic acid) can slowly degrade the silicone bonds over time, especially on rimless tanks.
  • Inhabitant Safety: High-percentage alcohol sprays are volatile; you don’t want those fumes settling into your water column.
  • The Tea Alternative: Black tea is naturally acidic enough to cut through water spots but gentle on the hardware. Plus, the tannins are a natural part of many freshwater environments.

What You Need

  • 1 Spray Bottle (1-Cup Capacity)
  • 1 Cup Distilled Water (Boiling)
  • 3 Organic Black Tea Bags (English Breakfast, Irish Breakfast, or Classic Black)

The Procedure

  1. Steep: Place the tea bags in the hot distilled water and let them sit for 5 minutes.
  2. Cool: Remove the bags and allow the liquid to reach room temperature.
  3. Bottle: Pour the mixture into your spray bottle and attach the nozzle.
  4. Application: Shake well before each use. Spray directly onto the exterior glass and wipe vigorously with a clean paper towel or microfiber cloth until completely dry.

Technical Note: This mixture is strictly for the glass! It’s extremely bitter (trust me on this one), so keep it for the cleaning cabinet and away from your morning mug.

4.03.2026

High-Performance Filtration on a Budget

High-performance filtration doesn't require a branded price tag. After years of running various filter setups, I’ve found that the most effective media is often industrial-grade material hidden in the aisles of your local craft or hardware store. Here is how to build a professional-grade media stack on a budget.

1. Coarse Mechanical: The Plastic Scouring Pad

  • The Hack: Standard plastic scouring pads (often found in 6-packs for around $1).
  • Technical Tip: These function as excellent "first-stage" mechanical media. Their tangled structure creates a chaotic water path that traps large "muck" particles efficiently. Unlike "Easter grass" style media, these maintain their shape under the high-pressure flow of a canister filter.
  • Maintenance: Simply rinse in dechlorinated water and reuse indefinitely. Replace only if the plastic begins to brittle.

2. Medium Mechanical: Foam and "Crate" Textures

  • The Hack: Open-cell foam or unused mattress toppers (ensure they are untreated).
  • Technical Tip: Foam with a "convoluted" or egg-crate texture increases the surface area for water contact. This stage catches the mid-sized debris that the scouring pads miss.
  • Caution: Always perform a "scent check"—if the foam has a chemical or fire-retardant smell, skip it.

3. Fine Polishing: 100% Polyester Quilt Batting

  • The Hack: Polyester batting from a craft store.
  • Technical Tip: This is your "polishing layer." It traps the microscopic particles that cause water haze.
  • The Protocol: Because this material traps such fine waste, it becomes a "nitrate factory" if left too long. Treat this as a disposable media; swap it out every 4 weeks to prevent it from becoming a sludge-like barrier that slows your flow rate.

4. Biological Powerhouse: Crushed Lava Rock

  • The Hack: Landscaping-grade red lava rock.
  • Technical Tip: Lava rock is highly volcanic and porous, providing a massive internal surface area for nitrifying bacteria.
  • The "Hammer" Trick: If the rocks are too bulky for your filter trays, safely break them down with a hammer to increase the available surface area.

5. The "Permanent" Bio-Media Myth

  • The Technical Correction: Many manufacturers suggest replacing bio-media every 6 months. From a technical standpoint, this is unnecessary and can actually crash your cycle.
  • The Rule: Aerobic bacteria establish in weeks, but deep-pore anaerobic bacteria (which help with nitrates) can take 4-6 months to fully colonize. Never replace your bio-media unless it is physically disintegrating.

6. Repurposing Ceramic Rings

  • The Technical Insight: Ceramic rings are often too smooth to be top-tier bio-media. However, they are excellent for flow distribution. Place them at the very bottom of your canister to break up the initial "jet" of water, ensuring it spreads evenly across your mechanical pads.

7. Chemical Filtration: Decoding Purigen and Carbon

  • The Insight: Carbon is great for removing medications or heavy odors, but it exhausts quickly. Seachem Purigen is a synthetic "scavenger" resin. It targets nitrogenous organic waste before it turns into Ammonia. The color change (white to brown) is a mechanical indicator of exhaustion. It is more cost-effective long-term because it can be regenerated with a bleach/water solution.

8. Natural Water Adjusters: Driftwood & Shells

  • The Hack: Using crushed seashells to raise pH/KH or driftwood to lower it.
  • Technical Tip: While cost-effective, these are "passive" adjusters. They work slowly and can be unpredictable compared to a dedicated RO (Reverse Osmosis) system, but they are great for maintaining stability in a seasoned tank.

9. Disinfecting Media: The Vinegar Protocol

  • The Hack: Using a 1:1 ratio of water and vinegar on a clean rag.
  • Technical Tip: Vinegar is excellent for dissolving calcium and hard-water "crust" on media and filter parts. While it won't sterilize every pathogen, it is a safe, non-toxic way to deep-clean hardware without risking the health of your inhabitants.
  • Additional Tip: For heavy "crust" on intake tubes or impellers, a 30-minute soak in the 1:1 vinegar solution will dissolve buildup that a rag can't reach. 

10. Bio-Load Calculation

  • Technical Standard: Aim for 2.5 to 5 lbs of biological media per 30 gallons of water. This ensures you have enough "housing" for bacteria to handle the ammonia produced by your fish, especially in high-waste tanks.

4.02.2026

10 Tips to Improve Water Clarity

A cloudy tank is more than just an eyesore; it’s a biological red flag. Whether you’re seeing a milky haze, a green tint, or tea-colored water, each type of cloudiness requires a specific technical response to restore the balance of your ecosystem.

Identifying the Source

Before treating the water, you must diagnose the cause based on the color:
  • White/Milky: Typically a Bacterial Bloom. Common in new "cycling" setups or after a massive filter cleaning.
  • Green: An Algae Bloom. Usually triggered by excessive light or a nutrient spike (Nitrates/Phosphates).
  • Brown/Amber: Tannins leaching from driftwood or organic decay.

1. Nutrient Management (Bio-Load)

Overfeeding is the #1 cause of milky water. Excess food dissolves into the water column, fueling bacterial blooms.

Technical Tip: A general rule is, if your fish don't consume everything within 2 to 3 minutes, it’s too much. However, for slower foragers like Ranchu or fancy goldfish, allow up to 5 minutes, but ensure they are actively searching. If food is still sitting untouched after 5 minutes, it’s a biological hazard.

2. Substrate and Decor Hygiene

New substrate or driftwood can leach fine particles or tannins into the water.

The Fix: Always rinse new gravel until the water runs clear. For driftwood, boil the wood for at least an hour or soak it in a separate bucket for two weeks. If the water is already tinted, use Activated Carbon or Seachem Purigen in your filter.

3. Strategic Water Changes

A 20–30% water change is your best "reset button," but there is a limit.

The Technical Rule: Never change more than 50% of the water during an active bloom. Over-cleaning can shock your beneficial bacteria, potentially making a bacterial bloom even worse.

4. Light and Organic Decay

Green water is an explosion of single-celled algae.

The Fix: Limit your lighting to 6–8 hours max. Prune any decaying or "melting" plant leaves immediately, as they release the exact nutrients algae need to thrive.

5. Chemical Flocculants vs. Filtration

Water clarifiers (flocculants) like Seachem Clarity work by clumping tiny particles together so the filter can trap them.

The Technical Caution: Use these sparingly, as they can irritate the gills of sensitive species. Adding high-grade Activated Carbon to your filter tray is a more sustainable way to "polish" the water.

6. The "Bacterial Reset"

If your tank is struggling with "New Tank Syndrome," you need to outcompete the free-floating bacteria with beneficial strains.

Recommendation: Use live bacteria boosters like Seachem Stability or bacteria balls directly in your canister or HOB filter to stabilize the cycle.

7. Targeted Oxygenation

Cloudy water—especially green algae blooms—can rapidly deplete oxygen, putting your fish at risk of suffocation.

The Fix: Use an air diffuser to create micro-bubbles. Place the diffuser toward the center of the tank to ensure maximum gas exchange while you remedy the root cause.

8. UV Sterilization (The Definitive Fix)

When an Algae Bloom refuses to clear, a UV Sterilizer is the technical "nuclear option."

The Technical Rule: Only run the UV unit until the water is crystal clear. Constant use isn't necessary once the biological balance is restored and can lead to housing maintenance issues over time.

9. Filter Media Fine-Tuning (The Polishing Layer)

Standard sponge or ceramic media often let microscopic particles pass right through, leaving the water looking "dusty."

The Fix: Add a layer of filter floss (Poly-fil) or a 100-micron polishing pad as the final stage of your filtration. This mechanically traps the tiny debris that causes haze. Replace it every few days during a bloom, as it will clog quickly.

10. Avoid Substrate Disturbance

Sometimes cloudiness comes from over-cleaning the gravel.

The Technical Caution: If you vacuum your substrate too aggressively in an established tank, you can kick up "mulm" and trapped gases that trigger a bacterial spike.

The Fix: Only vacuum one-third or half of the substrate during a single water change. This keeps the water clear and prevents you from nuking the beneficial bacteria colonies living in the gravel.

4.01.2026

How to Identify and Treat Cloudy Eye

Identifying the cause of "eye cloud" is the first step toward saving your fish’s vision. While environmental stressors like ammonia spikes or low pH are common culprits, most persistent cases stem from an underlying bacterial or fungal infection. Addressing these biological triggers quickly is essential to preventing permanent damage.
The fish's eye is essentially an extension of its skin; when the protective mucosal barrier (slime coat) is compromised by poor water or injury, the eye becomes an open door for opportunistic pathogens.


The 50% Rule: Prepare the Environment

Before adding any medication, perform a 50% water change. Reducing the organic load in the water is critical; it ensures the treatment isn't fighting against accumulated waste and provides your fish with the clean, oxygen-rich environment they need to heal.
  • Remove Carbon: You must remove any activated carbon or chemical resins from your filter before dosing. Carbon is designed to strip medications from the water, rendering your treatment useless.
  • Watch for Old Tank Syndrome (OTS): If your tank has been neglected for months, a single 50% water change can cause fatal "pH shock." In these cases, perform three to four 15% water changes spaced 6–8 hours apart over the next two days. This gradually aligns the tank chemistry with your tap water before you begin medication.

First Response: API MelaFix

A quick and effective remedy for mild cases is API MelaFix. This all-natural treatment uses tea tree oil, which serves as a mild antifungal and antibacterial agent. It is particularly useful for repairing damaged fins, ulcers, and open wounds that often accompany the initial clouding.
 
Note on MelaFix 
In the aquarium community, MelaFix (tea tree oil) is sometimes controversial for certain species (like Labyrinth fish/bettas) because it can interfere with their breathing. So be sure to use caution as oil-based treatments can affect their specialized breathing organs. Do not use non-aquarium based tea tree oils as these generally aren't made for aquarium use and often contain surfactants or high concentrations that are toxic to fish. 


Identifying the Symptoms

Eye cloud visually resembles fogged-up water goggles; it appears as a smoky, translucent film over one or both of the fish's eyes. Once a fish develops this condition, they may remain susceptible to reoccurrences in the future, making consistent water quality monitoring essential. Use these technical distinctions to help determine the root cause:
  • Bilateral Exophthalmia: Cloudiness in both eyes almost always indicates a systemic issue. This is typically triggered by poor water quality, such as ammonia or nitrate spikes, or a widespread bacterial infection affecting the entire fish.
  • Unilateral Exophthalmia: When only one eye is affected, the cause is more likely related to physical trauma. This often happens when a fish bumps into sharp decor or is nipped by a territorial tank mate.
  • Corneal Edema: This technical term describes the "foggy" appearance caused by fluid seeping into the layers of the cornea. This usually happens after a breach in the fish's protective slime coat, allowing bacteria or irritants to enter the eye tissue. Adding a high-quality water conditioner (like Seachem Prime or StressGuard) during treatment can help bolster that natural defense.

Advanced Treatment Options

If a week of treatment with MelaFix does not clear the film, you may need to transition to a stronger, broad-spectrum antibiotic. While older remedies like Tetracycline or Sodium Sulfathiazole are still mentioned online, modern keepers often find better success with more targeted medications.

Seachem KanaPlex is widely considered a "gold standard" for stubborn cases because it is absorbed through the skin and gills, making it effective even if the fish has lost its appetite. Seachem PolyGuard remains a reliable choice for treating aggressive infections, as its blend of Nitrofurantoin and Sulfa drugs targets the severe gram-negative bacteria often found in goldfish and other heavy-slime-coat species.

3.30.2026

The Truth About Hand-Feeding Your Fish

While many hobbyists love the interaction of having their fish approach them for food, I’ve found several compelling reasons to avoid hand-feeding. This post covers my personal experience with the pros and cons of manual versus automated feeding. While hand-feeding is sometimes unavoidable depending on the species you keep, I generally advise against it for the health and safety of both the keeper and the fish.

Why You Should Reconsider Hand-Feeding

While the interaction is tempting, there are three primary risks to keep in mind:

1. Risk of Bacterial Contamination
Introducing bare hands into your aquarium or handling fish food directly can transfer harmful bacteria, oils, or soaps into the water. This can compromise your fish's immune system or disrupt the delicate balance of their habitat.

Pro-Tip: If you must reach into the tank, wear aquarium-safe gloves or use a dedicated scoop to pour food directly into the water.

2. Loss of Natural Survival Instincts

Training fish to associate large, external movements with food can be dangerous. When fish lose their natural fear of movement outside the tank or pond, they may inadvertently approach predators like cats or raccoons, thinking they are about to be fed. Additionally, for high-energy schooling fish, the "feeding frenzy" at the surface can lead to fish jumping out of the aquarium in the excitement.

3. Personal Safety and Physical Injury
If you are keeping predatory or carnivorous species, hand-feeding significantly increases the risk of a bite. Even a small "nip" from a fish can lead to infections or skin irritation for the keeper. Using tools keeps a safe distance between your fingers and their feeding response.

Wound Care Note:
If you do sustain a nip that breaks the skin, immediately wash the area with warm, soapy water and monitor for any unusual redness or swelling over the following weeks.


Here are the main risks you might want to be aware of:

While most fish nips are harmless, any break in the skin while your hands are in aquarium water carries a risk of infection because of the bacteria naturally present in that environment. In the hobby, this is often referred to as "Fish-Handler's Disease" or "Fish Tank Granuloma."

1. Mycobacterium marinum (The most common culprit)
This is a relative of the bacteria that causes tuberculosis. It’s found in both fresh and saltwater. If a fish nips you and breaks the skin, or if you have an existing scratch, this bacteria can enter and cause "Fish Tank Granuloma"—red, crusty bumps or nodules that can take weeks to appear and months to heal.

2. Aeromonas and Vibrio
  • Aeromonas: Frequently found in freshwater tanks. It can cause skin infections or, in rare cases, more systemic issues if it enters a wound.
  • Vibrio: More common in saltwater or brackish setups. Some strains are quite aggressive and can cause rapid swelling and tissue damage if a bite becomes infected.
3. Zoonotic Transfer
Because aquariums are warm, nutrient-rich environments, they are breeding grounds for various microbes. A nip isn't just a physical injury; it's a "dirty" puncture. Even "clean" water contains organic waste and bacteria that don't belong under your skin.

4. Secondary Infections
Even if the fish doesn't carry a specific "aquatic" disease, the wound itself can become a gateway for common bacteria like Staph or Strep that live on your own skin, especially since the wound was "primed" by tank water. 

When Hand-Feeding (or Manual Feeding) is Necessary

Despite the risks, there are specific scenarios where an automated approach simply won't work. In these cases, manual intervention is the only way to ensure your fish stay healthy.

1. Incompatibility with Auto-Feeders
Not all diets are "feeder-friendly." If you are using large pellets, frozen cubes, or specialized gels, an auto-feeder can easily clog or fail to dispense the correct portion. When your fish's nutritional needs require a complex or bulky diet, manual feeding becomes a logistical necessity.

2. Stimulating a Predatory Strike Response
Many carnivorous or predatory species are hardwired to hunt based on movement. If the food doesn't look "alive," they may ignore it entirely, leading to waste and poor water quality.

The Safe Alternative: Instead of using your fingers, use feeding tongs or aquascaping tweezers. This allows you to wiggle the food to mimic prey movement while keeping your hands clear of the "strike zone" and out of the water.

3. Deliberate Interaction and Behavioral Monitoring
If you choose to have your fish approach you for interaction, it should be a conscious decision made with a full understanding of the risks. While it’s tempting to treat a fish like a "water dog," remember that their safety comes first. Manual feeding—even if not done by hand—is the best time to perform a "roll call" and check each fish for signs of illness, stress, or injury that an auto-feeder might overlook.

3.29.2026

Steering Clear of Old Tank Syndrome

You’ve mastered the Nitrogen Cycle, your fish are thriving, and your maintenance routine is on autopilot. However, for many long-term fish keepers, a hidden danger is lurking in the substrate. It’s called Old Tank Syndrome (OTS), and it is the primary reason why "healthy" tanks suddenly start losing fish for no apparent reason.

What Exactly is Old Tank Syndrome?

OTS isn't a disease; it’s a slow, chemical shift in your water parameters. In a closed ecosystem, the very bacteria that keep your fish alive by processing ammonia are also consuming the Carbonates (KH) in your water.
Over months or years, if your water changes aren't frequent enough or large enough to replenish these minerals, your "Buffer" (KH) hits zero.

What's KH?

Gemini said

In the context of your aquarium, Carbonate Hardness (KH), often referred to as "alkalinity," is a measure of the dissolved carbonates and bicarbonates in your water. Think of KH as your tank’s chemical insurance policy. Its primary job is to act as a buffer, absorbing acids that are naturally produced by fish waste and biological filtration.

The Chain Reaction

  1. The pH Crash: Without Carbonates to stabilize the water, your pH will plummet. It’s not uncommon for a tank to drop from a steady 7.2 down to a 5.5 or lower.
  2. Bacterial Dormancy: Nitrifying bacteria—the ones that manage your Nitrogen Cycle—begin to die or go dormant once the pH drops below 6.0.
  3. The Ammonia Spike: With the bacteria "off duty," ammonia begins to climb.

The Paradox: Why are my fish still alive?

This is the most confusing part of OTS because the pH is so low, the toxic Ammonia (NH3) actually converts into Ammonium (NH4), which is significantly less toxic to fish. Your inhabitants slowly "acclimatize" to these worsening conditions.

However, the moment you add a new fish from a store with "clean" water, or you perform a massive 50% water change to "fix" the tank, the pH swings back up. This instantly turns that safe Ammonium back into deadly, burning Ammonia. This is why many hobbyists see their fish die immediately after a cleaning.

Diagnostic Checklist: Do you have OTS?

If your tank has been established for over a year, look for these red flags:
  • Nitrate Levels: Readings consistently over 80–100 ppm.
  • pH Levels: A significantly lower reading than your tap water source.
  • KH Levels: A test result of 0–1° dKH.
  • The "New Fish" Test: New additions die within 24–48 hours, while the old residents seem "fine."

The Professional Recovery Protocol

If you suspect Old Tank Syndrome, do not perform a massive water change. The shock will kill your fish.
  1. Test Your Source Water: Know your baseline pH and Hardness.
  2. Incremental Changes: Perform small 10% water changes every day for two weeks. This slowly raises the pH and mineral content without shocking the inhabitants.
  3. Monitor Ammonia: As the pH rises, the ammonia becomes more toxic. Use a high-quality water conditioner like Hikari Ultimate to detoxify the rising ammonia while your bacteria wake back up.
  4. Vacuum the Substrate: Gently remove accumulated organic waste (mulm) that is fueling the high nitrates, but do it in small sections so you don't stir up too much at once.
Additional Notes:
  • If your pH is within 0.3 of your tap water: You can safely do a standard 20–25% change.
  • If your tank is 0.4 pH lower than your tap water (e.g., your tank is 6.6 and your tap is 7.0): You can technically push it to 15% for a week, but 10% is still the "pro" recommendation for a reason.
  • If your pH is 0.5+ lower than your tap water: Stick to 10% daily for 2 weeks. This allows the fish to slowly "re-acclimatize" to the higher pH and mineral content.

What if the water changes don't work?

If you’ve done 14 days of consistent 10% water changes and that pH still won't stay up, you are dealing with a Buffer Black Hole. Basically, something in your tank is actively "eating" the alkalinity as fast as you’re adding it.

Here is the "Phase 2" checklist for when the two-week protocol isn't enough:


1. The "Mulm" Hunt (Deep Clean)
If your substrate is packed with fish waste (mulm), that decaying organic matter produces constant acid.
  • The Fix: During your 10% daily changes, focus only on vacuuming one small section of the gravel. Don't do the whole tank at once (that would crash your bacteria), but get the "sludge" out of the floor.

2. Check Your "Decor"
Do you have a lot of driftwood or Indian Almond Leaves? These release tannins which naturally lower pH.
  • The Fix: If the pH won't budge, you might need to temporarily remove some wood until the tank stabilizes.

3. Recharge your KH (The "Battery")
pH is the "voltage," but KH (Carbonate Hardness) is the "battery." If your tap water is very soft (low KH), it has no "buffer" to keep the pH from falling again the second the fish breathe.
  • The Fix: You may need to add a small mesh bag of crushed coral or aragonite to your filter. This dissolves slowly and acts like a "time-release" antacid for your tank, keeping the pH from crashing back down.

4. Test the Tap Again
Sometimes, city water changes seasonally.
  • The Fix: Let a cup of tap water sit on your counter for 24 hours with an air stone (or just stir it occasionally), then test it. If your tap water has actually dropped in pH, you'll never "fix" the tank with just water changes. If your tap water’s pH is naturally low or has crashed, you'll need to manually "recharge" its buffering capacity by adding a small mesh bag of crushed coral to your filter to act as a natural, steady antacid for the tank.

1.19.2026

A Guide to the Nitrogen Cycle

A successful freshwater aquarium is more than a display; it is a complex, self-sustaining ecosystem. For a hobbyist, the most critical responsibility is maintaining the "invisible" part of the tank: the Nitrogen Cycle. Understanding this process is the difference between a thriving environment and a failing one.

The Science of Nitrification

The nitrogen cycle is the biological process in which beneficial bacteria convert toxic waste into safer compounds. This is known as biological filtration. These bacteria do not live in the water itself, but colonize the surfaces of your filter media, substrate, and decor.

1. Ammonia (NH3)

Every inhabitant in your aquarium produces waste. As fish respire through their gills and organic matter (like uneaten food) decays, it releases Ammonia.

The Risk: Ammonia is highly toxic. It causes chemical burns to the gills and skin, leading to severe stress and eventual organ failure.

The Solution: In a healthy system, a bacterial colony called Nitrosomonas consumes the Ammonia, converting it into Nitrite.

2. Nitrite (NO2)

Nitrite is the second stage of the cycle. While it is a byproduct of "working" bacteria, it is still a potent toxin.

The Risk: Nitrite enters the fish’s bloodstream and prevents it from carrying oxygen, effectively causing the fish to suffocate regardless of how much oxygen is in the water.

The Solution: A second group of bacteria, Nitrobacter, colonizes the tank to process Nitrite into Nitrate.

3. Nitrate (NO3)

Nitrate is the final byproduct of the nitrification process. It is significantly less harmful than Ammonia or Nitrite, but it is not benign.

The Management: In the closed environment of an aquarium, Nitrate levels will continually rise. Because there are rarely enough anaerobic conditions to convert Nitrate into gas, it must be removed through regular water changes.

The Ideal: Aim to keep Nitrates below 20–40 ppm to ensure long-term health and prevent algae outbreaks.

Professional Management Protocols

To ensure your biological filter remains stable, follow these essential guidelines:

Maintain the Bio-Media: Your filter media houses the majority of your tank’s beneficial bacteria. To avoid a "cycle crash," never rinse your sponges or ceramic rings in untreated tap water, as chlorine will sterilize the colony. You should rinse the media in either a container of dechlorinated tap water or water removed from the aquarium. If you are concerned about a dip in bacterial activity, adding a supplemental dose of beneficial bacteria or a high-quality water conditioner during maintenance provides an extra layer of safety.

Avoid Overloading: Adding too many fish at once creates a "bio-load" that the existing bacteria cannot process fast enough. Always introduce new inhabitants gradually to allow the bacterial colonies to scale up naturally.

Test Regularly: A tank is officially "cycled" when your test results consistently show 0 ppm Ammonia and 0 ppm Nitrite, with a measurable reading of Nitrate.

Essential Equipment Checklist

1. Water Testing Kit (The Most Important Tool)

You cannot see ammonia or nitrite. A liquid test kit is generally more accurate than paper strips.
  • Recommendation: A master test kit that measures Ammonia (NH3), Nitrite (NO2), Nitrate (NO3), and pH.
  • Why: This is the only way to know exactly which stage of the cycle you are in.

2. Water Conditioner (Dechlorinator)

Before starting the nitrogen cycle, you must understand the chemistry of the water you are using. Every water source presents different challenges:
  • Municipal Tap Water: Treated with chlorine or chloramines which act as biocides that will instantly destroy your beneficial bacteria.
  • Well Water: Generally chlorine-free, but can contain high minerals, heavy metals, or existing nitrates.
  • Home Filtration Systems: RO systems or softeners alter hardness and chlorine but may strip out essential minerals bacteria need.
The Professional Standard: Never assume your water is safe. Always use a high-quality water conditioner and test your source water before it enters the aquarium. A lot of people like Seachem Prime, but I prefer Hikari Ultimate as I find Prime has a nauseating smell.
  • Pro-Tip: Look for water conditioners that "detoxify" ammonia and nitrite for 24–48 hours rather than removing them entirely. This keeps the water safe for fish while allowing the bacteria to "eat" and grow.
  • What to Avoid: Do not use Aquarium Salt or Zeolite during the initial cycling process. Aquarium Salt acts as a cleaning agent that slows bacterial growth; Zeolite removes the ammonia your bacteria need to survive, effectively stalling the cycle.
  • The Golden Rule: You can use salt for treatments or Zeolite for emergencies on an established aquarium later. However, never use them together. Salt recharges Zeolite, causing it to instantly dump all trapped ammonia back into your water.

3. An Ammonia Source

The bacteria need "food" to grow. If there is no ammonia, the cycle will never start.
  • Options: Pure "Reagent Grade" Ammonium Chloride, a very small number of hardy fish, or a daily pinch of fish food.

4. Biological Filter Media

Bacteria need a "house" to live in. Use high-porosity media like ceramic rings, bio-foams, or lava rocks to provide maximum surface area for the colonies to grow.

5. Bottled Beneficial Bacteria (Optional but Recommended)

"Seeding" the tank can significantly speed up the process. Add this directly into the filter. I personally like Seachem Stability.

6. A Consistent Heat Source

Nitrifying bacteria are living organisms that grow faster in stable, warm water.
  • Requirement: An adjustable aquarium heater.
  • Goal: Keep the water between 75°F–82°F (24°C–28°C). Note: Research the specific requirements of the fish you purchase, as they have varied preferences.

1.07.2026

Twenty Years of Rescues That Weren't

For nearly two decades, millions flocked to the Georgia Aquarium, marveling at the majestic whale sharks gliding through the Ocean Voyager exhibit. When Taroko, one of their iconic males, was euthanized in August 2025, the aquarium, as expected, issued a statement about his long life and the scientific contributions he made as an "ambassador" for his species.

But what if I told you that the story of Taroko and his fellow captive whale sharks is far more complex, riddled with a profound irony that stretches across oceans, costs millions, and continues to fuel a heated ethical debate? Let's dive deep into the true cost of "saving" a whale shark.

The "Rescue": A Last-Minute Leap Before the Ban

The narrative spun by the Georgia Aquarium has always been one of rescue: these magnificent creatures were plucked from certain death in Taiwanese fish markets. And to a degree, this is true. In the early 2000s, Taiwan had a legal quota for whale shark harvests, where these gentle giants were destined for meat markets. When the aquarium acquired its first sharks, including Taroko and Yushan, they were indeed facing the butcher's knife.

However, the timing of their acquisition, particularly Taroko's, reveals a strategic maneuver more than a spontaneous act of mercy. By early 2007, the Taiwanese government had announced a full ban on whale shark capture, sale, and export, effective January 1, 2008. The aquarium, fully aware of this closing window, made a deliberate "leap." Taroko and Yushan arrived in Atlanta in June 2007 – just six months before the ban would have made their acquisition impossible.

This wasn't a desperate dash to save a single stranded animal; it was a carefully executed, multi-million dollar commercial transaction, leveraging the last legal opportunity to stock one of the world's most impressive exhibits.

The Multi-Million Dollar Paradox: Cost vs. Conservation

Let’s talk numbers, because this is where the irony truly bites.

The logistical feat of transporting these behemoths—requiring custom-built, 25-ton tanks and a modified Boeing 747 cargo jet—cost an estimated $1 million to $2 million per pair of sharks. This doesn't even include the purchase price from the Taiwanese fishermen or the ongoing operational costs of feeding, filtering, and maintaining a 6.3-million-gallon exhibit for two decades.

Now, consider the alternative: At that same time, retrofitting a single Taiwanese fishing net with "escape hatches" for whale sharks costs less than $5,000. So, for the price of flying just one shark to Atlanta, the aquarium could have funded modifications for 60 to 70 nets, potentially saving dozens, if not hundreds, of wild sharks from entanglement – the very fate that led to their market capture.

The Georgia Aquarium, like many institutions, does fund field conservation. However, their tax filings often reveal that the vast majority of their "conservation" budget is directed towards the internal care of their own animals and exhibits, rather than direct, impactful efforts to save wild populations. The economics are clear: one "ambassador" in a tank generates millions in ticket sales; hundreds of saved sharks swimming freely in the ocean do not.

The "Non-Releasable" Loophole: Jebbie's Story

The argument for captivity often hinges on the idea that these sharks become "non-releasable" after years in captivity. They supposedly lack the muscle tone for deep-sea diving, the navigation skills for migration, and the foraging instincts to survive.

But then there's Jebbie. Acquired in 2021, Jebbie was the first whale shark brought to the aquarium in 14 years, long after the Taiwanese ban. He was touted as a true "rescue," found entangled in a net and deemed "unfit for release." Yet, this shark—too injured to survive in the wild—was strong enough to endure a 30-hour, 8,000-mile journey in a specially outfitted cargo plane, constantly monitored by vets and life support systems.

The glaring contradiction highlights the ethical tightrope aquariums walk. If a shark is robust enough to survive such an arduous journey, was it truly too fragile to be released locally after careful rehabilitation? Or was the "non-releasable" label a convenient justification for filling an exhibit that had dwindled to just two sharks after the deaths of Alice and Trixie in 2020-2021?

The Inadequate Habitat: Why Even 6 Million Gallons Isn't Enough

The scientific data supports this skepticism. While the Ocean Voyager exhibit is a technological marvel, it is fundamentally inadequate for a whale shark.

  • Muscle Atrophy: Wild whale sharks are constant, long-distance swimmers, diving thousands of feet. In a tank, they swim repetitive circles, leading to asymmetrical muscle development and chronic physical stress. Blood analysis reveals higher levels of creatine phosphokinase (CPK), indicating muscle damage, and elevated cortisol (a stress hormone) in captive sharks.
  • Lost Instincts: Crucial homarine levels, vital for cellular health in the deep ocean, plummet in captivity. Their gut microbiome shifts, losing microbes essential for deep-diving and nutrient processing. Their natural navigation and foraging instincts atrophy.

  • Life Expectancy: In the wild, whale sharks can live up to 70-150 years. In captivity, the record is just 26 years. Taroko, at 18 years in the tank, died far short of his natural lifespan.

The claim that a tank is "adequate" is often based on the shark simply being alive and appearing calm to visitors, not on its complex biological needs.

The Lasting Legacy: A Call for True Conservation

With Taroko's passing in 2025, and only Yushan and Jebbie remaining (likely the last whale sharks the Georgia Aquarium will ever acquire due to heightened international protections), the institution is at a critical juncture.

The "300 annual deaths" in Taiwan that once made headlines are finally starting to decrease, not because sharks are being flown to Atlanta, but because conservationists are working with local fishermen to implement real-time reporting systems and outfit nets with escape hatches. This demonstrates that on-site, proactive conservation is far more effective and ethical than expensive, long-distance "rescues" that prioritize display over true freedom.

Taroko provided valuable scientific data and inspired millions. But his life, and the lives of the other captive whale sharks, serve as a stark reminder: the act of "saving" an individual from a market, only to place it in an environment that ultimately shortens its life and renders it biologically unfit for the wild, is a complex ethical dilemma. It's a costly paradox that, for many, underscores the difference between rescue for display and true, systemic conservation.

It’s time to ask: Is paying millions for a "billion-dollar whale shark" truly conservation, or is it merely a financially lucrative way to fill a tank, leaving the real problems of the ocean largely unaddressed?

8.11.2017

Aquarium Updates and DIY's

Lately, I have had a few aquarium mishaps, the first being that I managed to crush my glass intake tube as I was trying to pull it apart from the tubing. That said, there has to be an easier way to separate those two pieces so if anyone has any tips on that please leave me a comment below and let me know as I have yet to see anything on that topic. Luckily, I didn't manage to cut myself as the tube shattered in my hand (I felt as if I was the Hulk that day) and I had kept the plastic intake tube that came with my canister filter originally so I will now have to use that one in the mean time.
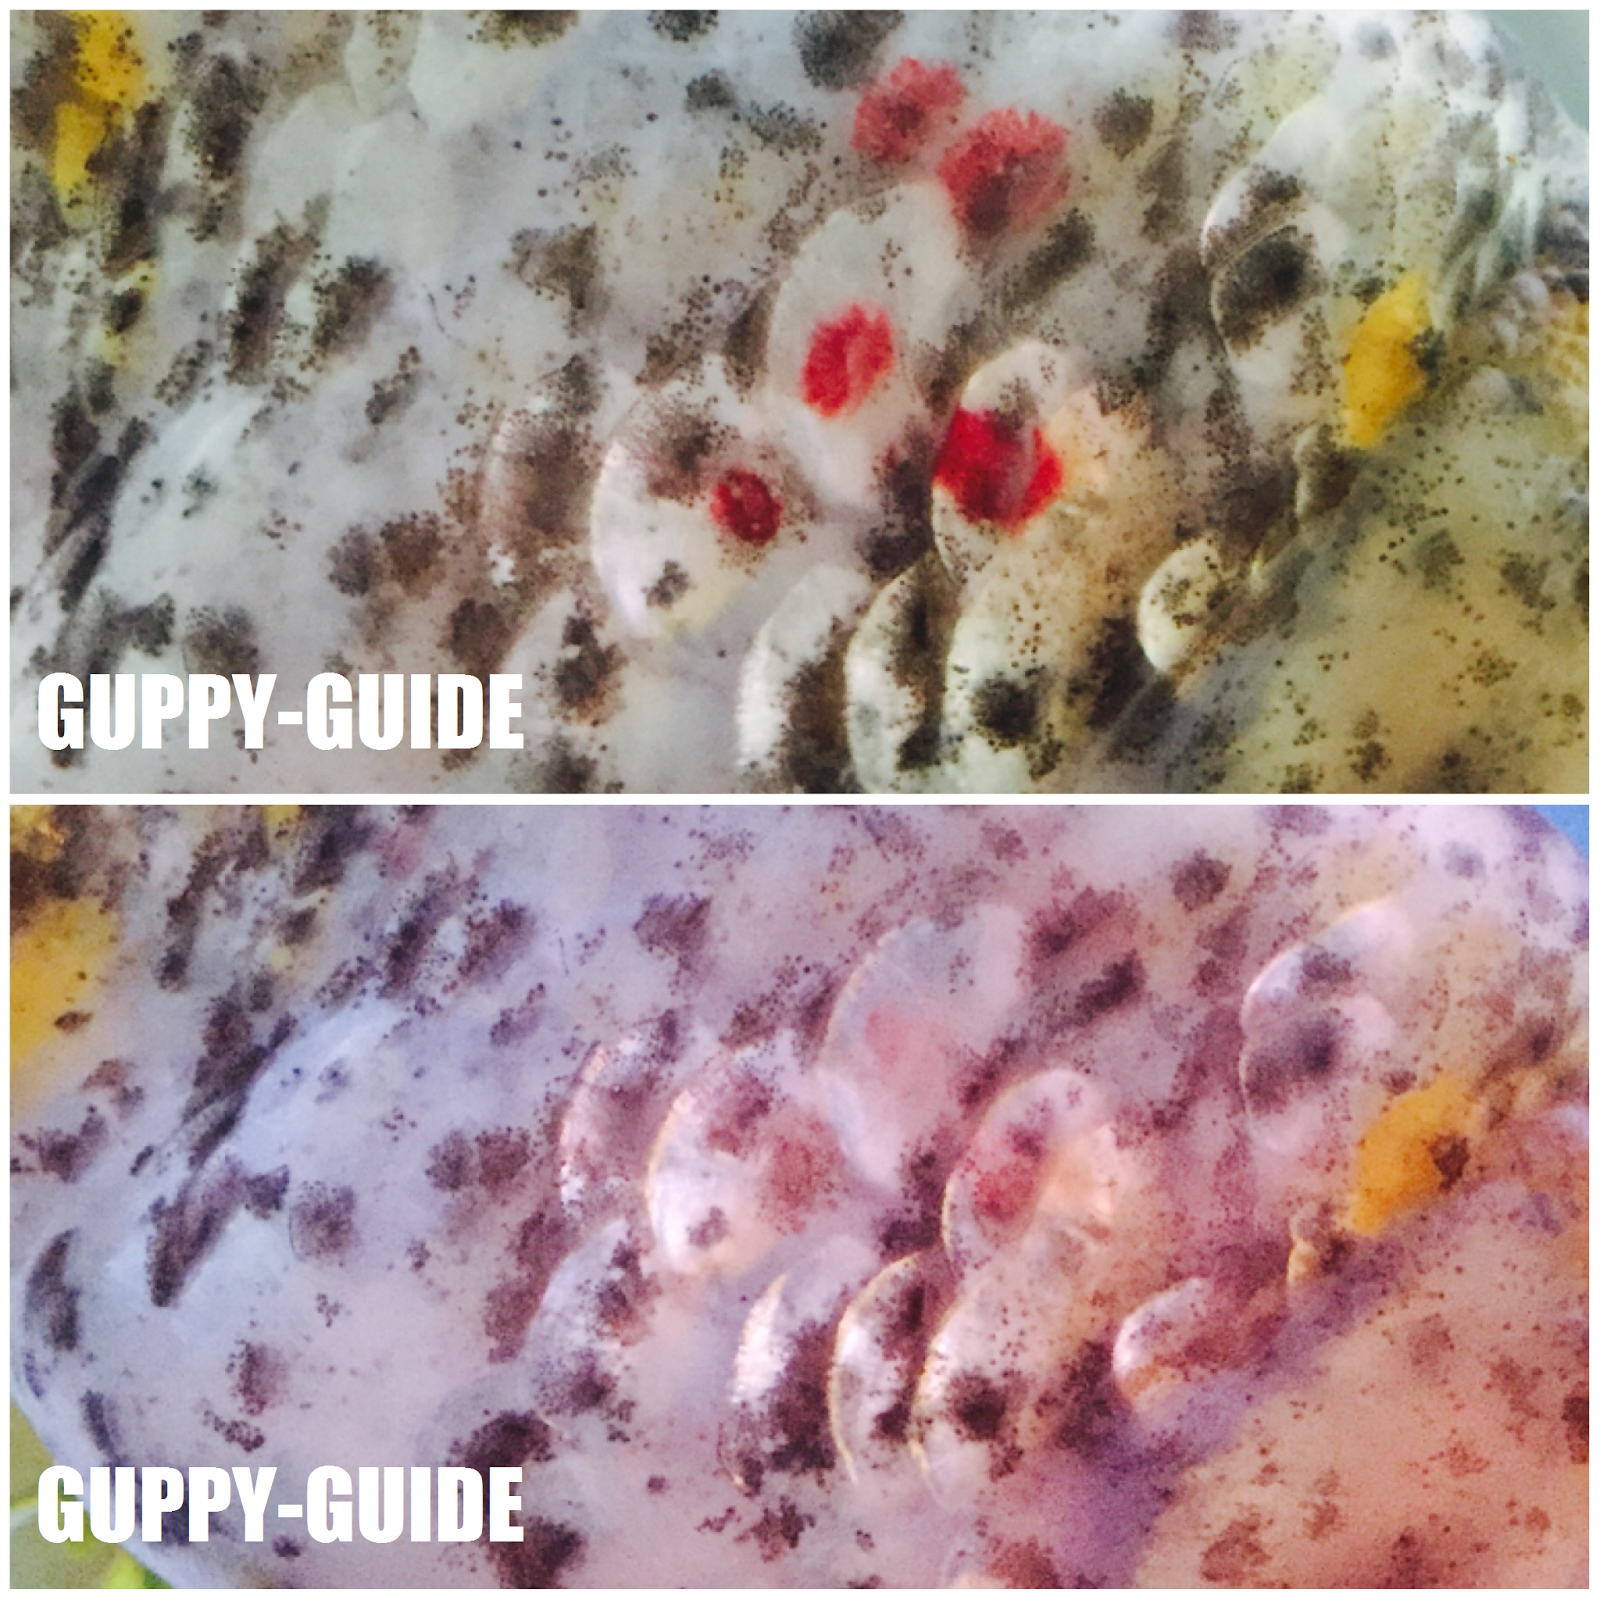
Red spots on Ramen - before (top image) and after (bottom image)
For those of you that don't follow me on IG I have lost 2 of my goldfish recently (Pocky and Ramen) due to some red spot/sore problem (as seen in the photo here). The size of these red sore looking spots would range from half an inch in size to smaller dots, and it was not caused by anything hurting them in the tank. Honestly, I probably could've prolonged their lives by not removing them from my main tank and placing them in 5g buckets for treatment but I didn't want to risk further harming my healthier looking fish and after months of trying to remedy this, I figured it was time to let them go (Ramen was basically stuck on her side for a month and began having trouble eating so, I didn't want to prolong that any longer). I'm not even sure what this is as I haven't been able to find many photos in which to identify this. I believe this may be VHS (Viral Hemorrhagic Septicemia), but I could be wrong as I have never dealt with this before. I tried tons of different medications, etc and I failed with all of them. Whatever this is, it's definitely highly contagious for my goldfish (not sure about other fish as this is just a goldfish tank currently). I noticed when I did my large weekly water changes it often would clear up a bit but over the course of a week it would reappear but the red spots would jump to random places on the body (not really the tail or head area). Sometimes there would be an almost grayish scab that would appear in the center but not always, which you may think is a parasite but I don't believe that was the case (I even dosed with Prazi). Whatever it is I believe to be an internal virus of some kind (I'm not a vet but that's just my best guess) and both fish suffered from Swim Bladder Disease before that occurred.

I am beginning to feel as though fish that end up with Swim Bladder Disease are more susceptible to having secondary issues. Perhaps a weak swim bladder could be a sign of a weak immune system (or SBD weakens a fish in general). It just seems little is known on how to remedy true Swim Bladder Disease without the aid of surgery and the fact it's called a disease makes me want to relate it more to a poor immune system which may have been affected by certain medications, or it could just be a heredity issue. I know some aquarists feel SBD can be remedied with diet change but I feel those results are temporary from my experience, and a major SBD issue won't truly be resolved by diet alone.

Also, I finally got around to trying out my Virkon tablets which are better at killing nasties than bleach and I will say that... it's not that bad. It does have a slight odor to it but I don't find it nearly as offensive as bleach or ammonia. Also, someone mentioned to me that they stopped using this product because it is corrosive, and actually in its powder/tablet form it is corrosive but once you get it to a 1% dilution in water (1 tablet + 1 pint of water) it is no longer considered corrosive (according to the label). Personally, I really like this product thus far as it doesn't seem to leave any residue as with bleach, but I would avoid using it directly on anything metal or electronic just to be on the safe side in terms of corrosiveness (the same can be said for products like Windex). 
Carpet mold from the tank when I started scrubbing it out.
As for my last mishap I learned that if you're using an untreated wood stand of some kind for your aquarium and it has an entirely flat base that rests on your carpet (I was using the top of a wood hutch) than you are basically asking for a mold problem. If any water goes near your carpet, overtime that moisture will creep under the wood base and thus you're very likely to end up with some mold, which was my experience this week. I ended up with some dry black splotchy looking mold and the best way I found to clean up this mess (first dispose of the moldy tank stand and find something better if possible) is to make an ammonia dilution (2 capfuls of ammonia per 1 gallon of water). Using an abrasive brush scrubber you'll than scrub over the carpet in circular motions with the ammonia mixture until the mold coloration removes (or is killed rather) and then you'll repeat this with some clean water. Next use a wet/dry vacuum to suck out the water from the carpet (and its surrounding areas) and then use a fan to help further dry out the area. The carpet may require an additional cleaning after this initial one has had time to dry out as it could still be a bit discolored.

That's all I have to share for this week and I have been super busy lately (hence the lack of posts) but I am working on putting together some new posts before I start back up at University the end of the month so do come by again soon!

6.02.2017

Proper Aquarium Size for a Betta

Often I find people wanting to put a betta fish in any type of tiny vase looking object around, and while you may be able to keep a betta fish alive in something like that, it may not be the healthiest of habitats for your betta. Now read closely as I am about to divulge to you my discovery on what size tank you should actually have for a betta fish. The minimum size tank you should have for a single betta fish is... 10 gallons! If you're thinking this is too big for a betta fish than hear me out.

If you have ever put a betta fish in a 20-gallon breeder tank (or perhaps larger) than monitor the betta's swim pattern by measuring its distance swam before it pauses. I found that a betta fish will swim close to half the length of a 20-gal breeder tank before it pauses briefly and continues swimming again at about this same distance every time. Which makes a 10-gal aquarium the ideal size in length for a betta fish. Now, this probably seems like it's a very roomy tank for a betta, but you can try adding a few smaller fish into this setup as well because let's not forget that a 10-gal tank also has width and height to it. While my betta was also in this bigger 20-gallon tank for over a month I also discovered its fins began to grow out more, which was not something I had ever seen happen before with a betta fish kept in these 3-gallon (or smaller) environments, and to myself that's even further reasoning as to why a betta shouldn't be kept in a tiny environment (a bigger environment will generally have more stable conditions as well).

Betta's I would say are close to 2-inches in length at adult size, which means you may be able to get away with adding several neon tetra's which are about 1-inch in length (be sure to do research on tank mates for your betta because they don't get along well with numerous types of other fish such as other betta fish, guppies, goldfish, etc.). There may be some exceptions to this rule of tank mates, but I prefer not to risk it as it can cause fish injury, death, or having to return tank mates. An aquarium should be fairly stress-free for all its inhabitants.

You should be able to find a 10-gallon aquarium for a mere $10 in-store at Petco (they have a $1 per gallon sale about twice a year and I found select Petco's may always carry the 10-gal's for $10), and it's money well spent for a healthy betta fish habitat. You can also find inexpensive secondhand aquariums from Craigslist, LetGo, local antique shops, and sometimes even yard sales. In terms of cost for aquariums, I generally stick with the $1 per gallon rule, and no more than $4 per gallon for larger used aquariums (if the aquarium has a lid, etc. than obviously, the cost will be a bit more).

5.26.2017

Preferred Filter - Poll Results

Not long ago I posted a poll up in the sidebar and asked everyone what their preferred filter of choice was, and the results are now in so, be sure to come by again to participate in the next poll!
The top two choices for aquarium filtration were Canister filters at 46% and Power filters at 26%. Sponge, Undergravel and some Other type of filtration were all tied at 20% which left Wet/Dry filters at 6%, and no one appeared to like Internal filters which showed at 0%. 

As for my opinion on the best filter, it really just depends on your setup and what you want to achieve.

Canister filters are great if you need something that can house a lot of beneficial bacteria, but I don't find they always clean the best, although you can add inline UV sterilizers or inline heaters so they are pretty customizable in terms of what you can do. 

A Power filter I find can generally clean better than a Canister filter, but they often lack the capacity to hold a lot of beneficial bacteria which a Canister is more capable of doing. Generally, a Power filter is not as customizable as a Canister filter but Power filters are becoming move advanced with bigger boxes to house more media and built-in UV sterilizers (which before this was mostly a Canister filter feature). 

Both Sponge and Undergravel filters have their place in the aquarium world, but they often don't offer any media benefits, they aren't that customizable and personally, I find them to be more of secondary type of filtration used alongside a Canister or Power filter. They're good if you don't want a lot of water current in a tank, or if you need more surface agitation, and personally the Sponge can give a little beneficial bacteria while an Undergravel filter is really just made to disperse gas from waste and cycle water with carbon which helps to remove discoloring and water chemicals. 

Wet/Dry or Sump filters are very similar to a Canister filter but they're generally on a much larger scale. The reason these may lack popularity based on this poll is because they can become costly and it takes some amount of knowledge at times to set these up properly. These do allow for more water aeration in comparison to the other filters mentioned on here. For large aquarium setups having one of these can practically double a tank's water capacity.

Internal filters are pretty similar to Power filters accept they take up much-needed aquarium space inside the tank and they aren't always that attractive to look at. Most the time I see people recommending these for shallow water pets such as frogs that can go in the water or on land.

As for other types of filters, there are new ones I hear about all the time and recently one of those is a Trickle/Shower filter. This type of filter is similar to a Wet/Dry filter although it usually sits above the water rather than below it. You'll also find Moving Bed and Powerhead filters, and I'm sure some other types that I can't think of at the moment but this should cover the most popular of filters you'll come across in the aquarium hobby today. 

Also, big THANKS to everyone who helped participate in my poll because you helped to make this post possible.

5.19.2017

Cucumber Water in the Aquarium

I know, I know, it has been awhile since I have attempted any new little side experiments but being that I'm on summer vacation from University means that I have a bit more free time on my hands.
The Experiment
For today's experiment, I was curious what would happen if I added some homemade cucumber water into my goldfish aquarium (I'm not sure if you should try this with all types of fish but you can try it on yourself). I was originally hoping that it would work as a diuretic much like that of pea's being fed to a goldfish in order to alleviate some bladder issues because according to my research it's supposed to be more of a diuretic than that of peas. You may be wondering "why didn't you just feed it to them" and I did try to do that but they weren't that interested in actually eating it even though they acknowledged it being there. So by making cucumber water they basically have no choice but to ingest it via the aquarium water (right?). Cucumber water also allows the fish to get some nutrients and electrolytes in the process, just in case this diuretic ordeal doesn't work out, but as always try this at your own risk.

What you'll need...
1 - Cucumber (preferably organic)
2 Cups - Water, bottled

Start by washing the cucumber thoroughly. Peel the skin off of the cucumber. Slice the cucumber into 1/4 inch slices. Place the cucumber into a glass container of appropriate size. Add in the water (it should cover the cucumber), close the container, and place in the fridge for at least 24hrs. Discard the cucumber (or eat it yourself) and the pour the water into a cup. Allow the cucumber water to get room temperature and pour it into the aquarium.

Results
While I did not find that this worked as a diuretic (perhaps my batch was too small for a 30gal tank or maybe I should've turned off my filter) I did find this worked more as an appetite enticer (more so than when I used garlic drops for goldfish). Once the tasty cucumber water was added into the tank it took no time at all for the goldfish to quickly zoom about the tank in search of something tasty to eat (in which case I fed them some sinking pellets to watch them gobble those up). So perhaps if you have finicky freshwater fish that are into eating vegetables but they haven't been eating much lately then you could give this a try in order to entice them or perhaps force feed a sick fish (which is what I do with Vitachem).

5.06.2017

Fish Room / Bedroom Tour


I finally got around to putting together a video of my Fish Room / Bedroom! This is my first official Guppy-Guide video on YouTube so let me know if you enjoyed this in the comments below and I'll see about making more video content for you in the future. Thanks for watching and don't forget to LIKE and SUBSCRIBE.

12.28.2016

Meet Momo

I was not really planning on getting another betta after Neptune passed away, but while I was in PETCO browsing the leftover stock from all the holiday shoppers this little male koi betta fish just spoke to me, and I absolutely adore him. This tri-colored betta fish has quickly become my favorite of all with his vibrant red color, white underside, and black markings. To me he combines all the fish I have kept for the past several years now as he has the markings of a koi (relation to a goldfish), the personality of a guppy (with his fin movements), and he's a betta... so to me he's like 3 awesome fish in 1.
Momo the male koi betta
I decided to name my new betta Momo to not only mimic a past favorite betta of mine Mr. Moto, but also because he has spots like that of a cow (moo moo). Momo is pretty relaxed for a betta but definitely seems to get quick bursts of energy. He is also a huge pig as he just loves to eat, and thus far he seems to interact well with people around his tank. There's just something about Momo that really just makes me happy and puts a smile on my face... I already love him so much.