Showing posts with label DIY. Show all posts

2.22.2015

Water Change via Pond Pump

If you have been using something like a gravel vacuum and bucket to do your water changes because you can't connect a water-flow control valve to your sink faucet (and at this point you've probably exhausted yourself), or perhaps your home doesn't have the best water pressure, or you don't want to waste as much water as with a typical water-flow control valve than what I am about to show you is a super simple solution and a total game changer!
Say goodbye to buckets and buy yourself a pond pump and enough hosing (that will fit onto your pond pump) to reach from your sink, bathtub, etc to your aquarium (and you may want something to hold your hose in place.. like a clamp or heavy object). 

How-To
Connect the hose and pond pump together. Set the pond pump into your aquarium while the other end of the hose goes in the sink drain. Plug in the pump and the water will remove the tanks water and go down the sinks drain.

To fill the tank back up you adjust your sinks water temperature as needed, close the sink drain (so it will continuously fill with water), and leave the water running (traditional sinks usually don't overflow as they have a top drain hole). Place the end of the hose into the aquarium and then plug in the pump by the sink and place the pump into the sink of continuously running water.

Once the tank is filled with clean water unplug the pond pump (assuming it doesn't have an off/on switch like mine), place your finger over the end of the tube in the tank and bring it to sink to drain out any excess water in the tube.

Additional Tips
Pond pumps don't really have a lot of suction when pumping water so you probably won't have to worry about fish, gravel, etc getting sucked up into these vents. If you are worried about small fry, etc getting into the pump than you can try placing the pump device into some panty-hose (or other fine fabric that water can easily travel through) and knotting off the fabric around the pump. 

Be sure your sink or tub is clean before filling it with water (vinegar is one of the best natural cleaning agents in my opinion) as sinks are one of the germiest places in the home (more so than the average toilet). You could also place a clean bowl inside your sink to place the pond pump in instead of having it set in the sink itself (which is probably the best way to go about this anyway), and this could also be beneficial if your sink doesn't have a top drain so that you don't have to worry about water overflowing and you could then leave the sink drain open instead.

I use the Tetra 140GPH Pond Pump, it comes with 3 different sized hose adapters (a 1/4, 3/8, and 1/2 inch ID) and has an adjustable flow rate (which gives off around 3 inches of head at its lowest setting and over a foot of head on its highest setting). Keep in mind the GPH when looking for a pond pump because that will control how fast you can get your water change/s done (with the 20ft vinyl hose I attach to this pump I can basically empty 1 gallon of water per minute). 

1.25.2015

DIY External Canister Media Baskets

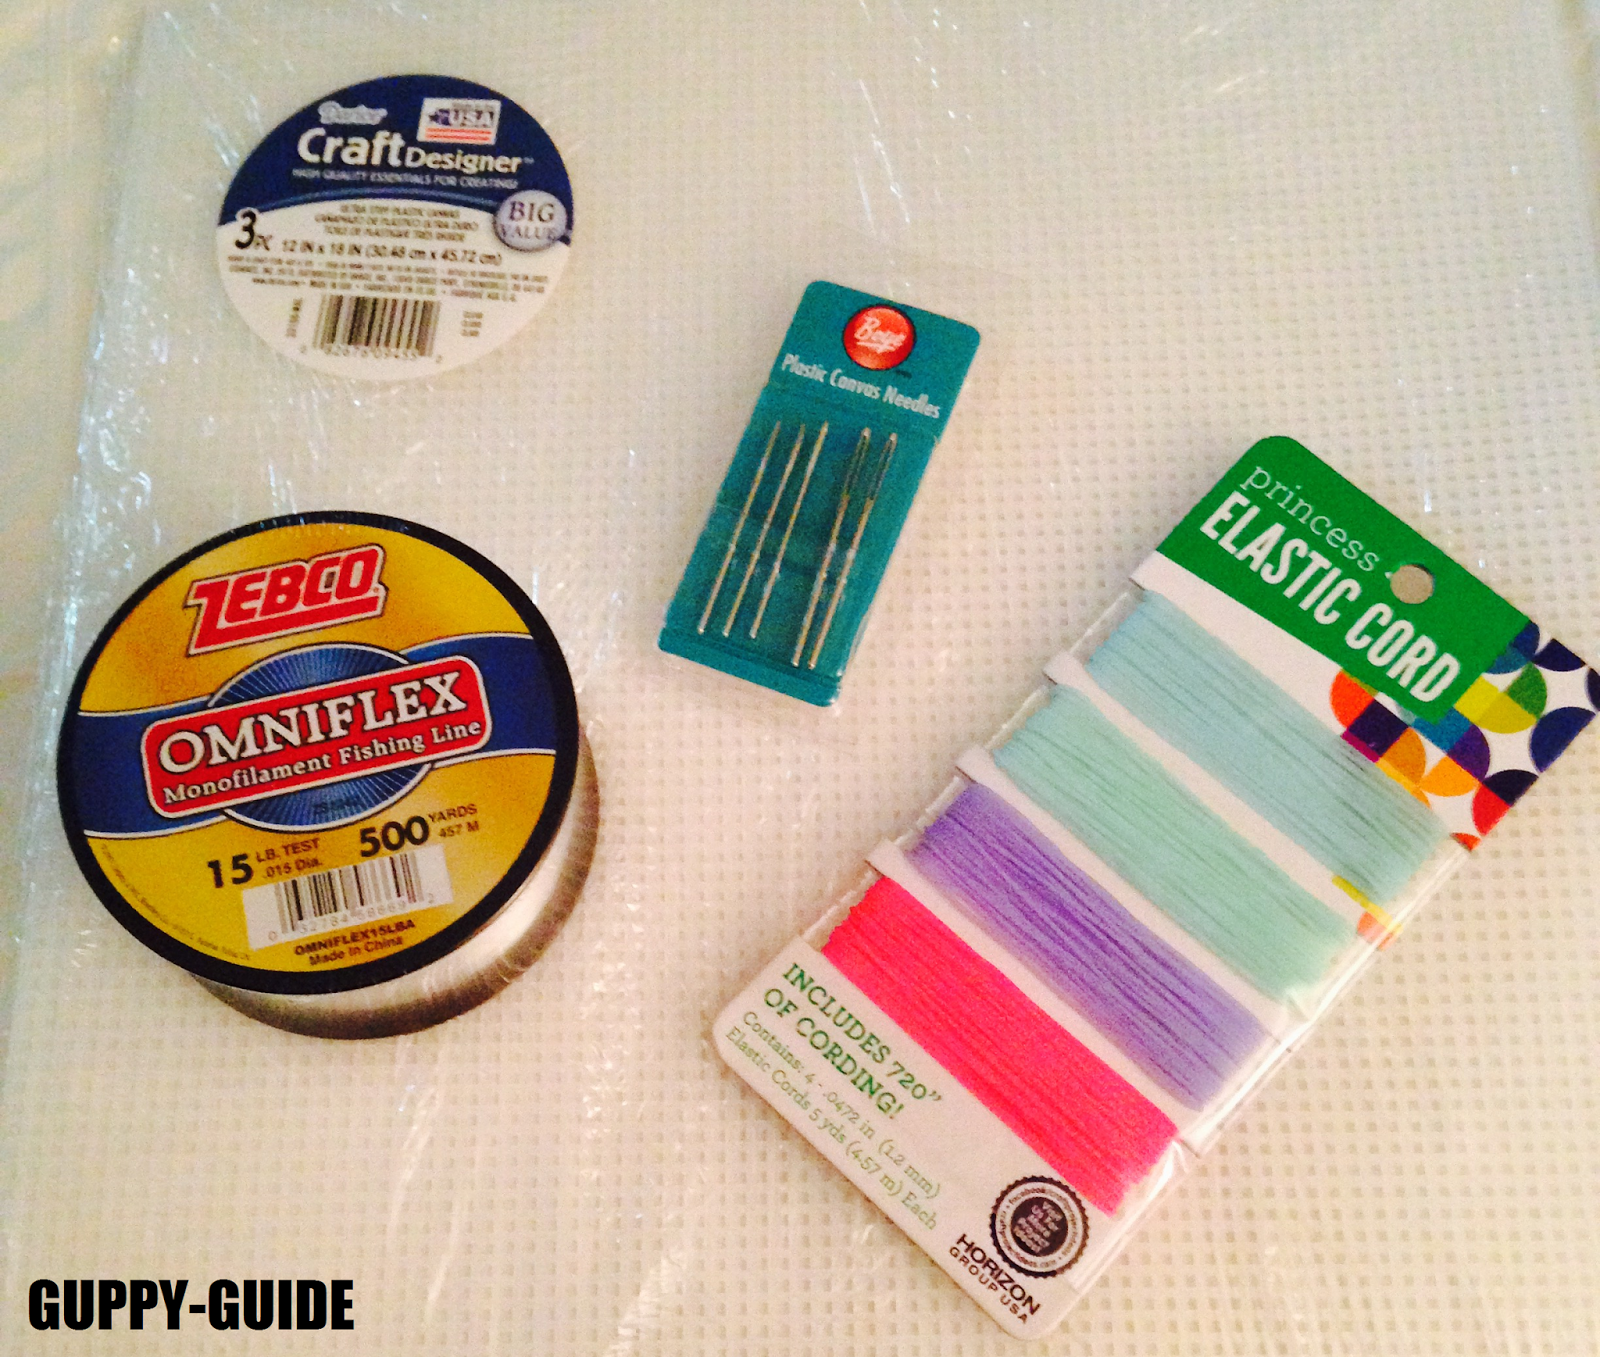
I decided to redo my (EHEIM 2211) external canister filter setup because honestly it was not setup as efficiently/correctly as it should have been (big thanks to PondGuru). In doing so I decided I wanted some canister media baskets for my canister filter since it did not come with any (the basic concept for these media baskets is credited to Mike Creuzer). I got all these supplies from WalMart, I made two media baskets, and I had plenty of material leftover.
Completed media basket.
Items Used
Stiff Plastic Canvas (the stiffer the canvas the sturdier the basket)
Fishing Line (I chose 15lb to ensure durability for my basket/s media weight needs)
Plastic Elastic Cord (or similar)
Needle
Sharpie Marker
Lighter
Scissors
Supplies
Basket Sides
Start by placing and forming the plastic canvas into the inside of the canister filter to figure out what dimensions the basket will need to be (measuring is the most crucial step for this project). Add on an extra overlapping inch to the width measurement to allow for more support to the sides of the basket. Use a sharpie marker to mark where you'll need to cut your canvas. Cut out the plastic canvas size needed. Cup your canvas together to form a circular tube shape and use fishing line to sew/knot together the canvas sides (I did triple knots). To better secure the knots I took a lighter and burned off any loose ends just to melt everything together a smidge.
The two shapes needed to create a media basket.
Basket Base
As a base template for the basket I used the round filter basin that this filter came with to trace where to cut out another piece of plastic canvas. Attach the base to one end of the basket sides using the fishing line to complete the basket (it's not necessary to sew the entire base, just enough to hold the media in).
Basket handle
Basket Handle
To make the basket/s a bit easier to remove from the canister filter tie on some plastic cord to the top sides of the basket to create a handle. Don't make the handle too tight because you want to be able to get your media in and out easily and you don't want your basket to awkwardly bend inward.
Completed media basket.
Your basket/s should now slide nicely inside the canister filter and once full of media the baskets should sit on top of one another (assuming you made more than 1 basket). If for some reason it doesn't than you could always add on a small semi-circle piece and attach it to the top rim.

9.01.2014

Aquarium Light Stand - DIY

I have honestly been looking for a similar way to DIY one of those pricey new aquarium lighting hoods that attach to the top outer edge of the aquarium. Low and behold I found this idea to create something a little similar to one. I mostly like the fact that the light is up away from the aquarium lid because when water builds under the glass tank lid and the light is on, it tends to get hot and almost burn the water onto the lid (which looks dirty and gross), thus allowing less light to shine into the tank overtime.
ikeahackers.net
Items Needed
-Glass Aquarium Hood (or an acrylic tank if you have one will work on its own)
-Clear Aquarium Silicon (or epoxy)
-Aquarium Light Fixture
-Knob Pulls, or handles (or similar.. like candle holders)

Attach the knob pulls (the ones in the photo are the SATTA acrylic knobs from IKEA) to the light fixture using the silicon and allow to dry. Place the fixture on-top a flat glass top aquarium lid or an acrylic tank. For the blue-ish glowing effect you'll want an LED aquarium light fixture, otherwise try a light fixture that takes regular aquarium bulbs and opt for the color coated ones (blue, red, etc).

A few handle options... 1, 2, 3, 4, 5, 6, 7, 8

11.27.2013

Increase Oxygen

Here I've listed 5 simple ways to help increase oxygen levels in an aquarium.

#1 Lower Water Level. Try not to fill your aquarium all the way to the brim with water, as water drops down into the aquarium (waterfall effect) from the filter it forces water down into the aquarium and helps push oxygen into the water thus helping to increase oxygen levels (be sure the current is not too strong for the aquariums inhabitants).

#2 Water Changes. Too many water chemicals and/or waste, etc can cause a loss of oxygen in the water, it's very important to do regular water changes (clean tap water contains adequate amounts of oxygen).

#3 Lower Temperature. Cooler temperatures can hold more oxygen than warmer temperatures but, be sure the aquarium is the proper temperature for the aquariums inhabitants.

#4 Air Diffusers, Bubblers, etc. With these devices attached to an air pump it helps to increase oxygen and water movement in an aquarium.
Air Diffuser

* Bubbles should be tiny (almost pin hole size) looking for the most part, and probably vary in size. The tank should not just have large (about a cm) and/or slow moving bubbles as this may mean your water has become thickened by dirty water. Also be sure your air pump is strong enough to operate the equipment properly, and clean or replace old diffusers, tubing, and check valves as needed.

#5 Filtration. The right amount of filtration is key to keeping a healthy and clean aquarium, you want to make sure the tank is not overstocked with fish either as the fish will be competing for oxygen. Keep filter cartridges clean, and active carbon can help remove unwanted chemicals and aid in oxygen levels.

8.23.2013

How to Clean Aquarium Nets

I am sure their are many different methods and techniques for cleaning aquarium nets however, I have found this way to be the quickest, easiest and safest bet for myself. I am sure some may have tried things like bleach, and I would advise against using it since bleach is very hard to rinse off, is very toxic, and it can weaken fabric aquarium netting. So, for my following how-to tutorial you'll only be needing a few things to clean your aquarium nets...

You'll need...
-Water, boiling
-Hydrogen Peroxide, in a spray bottle
-Net Soak
-Unscented Antibacterial Foaming Soap

How to...
If by some chance your aquarium net happens to be covered in filth (for whatever reason) than you may want to try washing the net first with an unscented antibacterial foaming soap before attempting the below method, otherwise skip this step.

Start by liberally spraying your entire aquarium net (handle and all) with hydrogen peroxide. Let the peroxide work its cleansing magic for around 15-30 minutes (you may see the peroxide turn white on the net as it kills off any bacteria). Rinse off the entire aquarium net by carefully pouring on the boiling water. Shake off excess water from the aquarium net. Allow the net to air-dry overnight.

If your net is looking dry or you have numerous aquariums you're dealing with then you'll want to use a Net Soak solution as to avoid cross contamination between tanks and/or to keep your net conditioned so that the netting doesn't scratch/harm the fish. Net Soak will also clean your net, the one I use does not require rinsing and claims to not harm fish.

9.23.2012

Cheap Pico Aquariums

I have recently been seeing some questions regarding inexpensive pico aquariums (a "pico" aquarium is generally an aquarium that holds 5.5 gallons or less of water). Personally, I can't see spending more than $1-$3 a gallon for an aquarium unless it comes with a light, or filtration system, etc this is because I can buy a $10 10-gallon aquarium at Petco with my bonus card (as a side note, a 10-gallon aquarium would be classified as a "nano" aquarium).

-The cheapest pico aquariums I have seen are typically at WalMart where they're often on clearance, their are many different types to choose from.

-Another idea (which I've done) for an easy cheap DIY pico tank is to purchase this $12 container of Ferrero Rocher's chocolates, although it does cost a little under $12 you do get to enjoy 27 chocolates while you create your pico (ok, you don't have to eat them all at once, haha). Just remove all the contents and stickers from the plastic container and you have yourself a nice small pico aquarium with a lid (you could even reattach the bow if you want to give someone a small fish as a gift!).

-Another route you could take would be to use some type of clear food container or similar (try the dollar stores!).

-Other places you may find things you can make a pico aquarium out of would be craft stores, yard sales, antique shops, and even some thrift stores.

7.15.2012

Aquarium Updates

Lately I find myself being more focused on the outer setup of my aquarium... wanting to change up some of my wiring setup and so forth. I've been debating 'timers' and I think I will actually do a quick post on them to help anyone else looking to use timers for their aquarium setup. I'm still wanting to purchase a canister filter at some point and I'm also looking for another light fixture. I'm also becoming disappointed with one of my Zilla Digital Thermometers so I'll either exchange it or perhaps find something better (any suggestions?). I'm also working on creating my own DIY aquarium lid (if I can figure out what parts I'm in need of) which I think will be very cool so, for those of you out their that may not be fans of bulky aquarium hoods that want something a bit more invisible then you may also be interested in that as well.

As for new things I recently purchased one of Petco's "zebra stones" which I believe is just a chunk of granite, and I'm hoping to find some additional pieces of the stone in the future but each piece is different so it's only a matter of finding ones that appeal to my wants. Also big news, I finally caved and bought another Betta fish yesterday and he's a halfmoon double tail whom I have named Ebo. So, if you want to see pics of Ebo and know more about him then you'll have to come check him out in future posts to come as well... although I may actually be returning him because I noticed he has fin rot and I haven't yet found a decent fin rot remedy thus far.

I've also recently donated an old 10gal aquarium and Top Fin heater to a co-worker of mine who has got on the 'fish boat' with me, YEAH! haha. So now I have my new Aqueon heater in my female guppy tank and they are super happy with that, I even added an undergravel bubbler from Walmart to their tank. Also I think I may have posted before about my homes water system being changed out and my water went from 'Very Hard' to 'Soft', and has now turned 'Very Soft"... I'm not sure how this will affect my fish but I really wish the pH would go down on our tap water, eep. For now I believe that's it for my recent aquarium updates and if you have any questions or comments please feel free to ask :)

6.09.2011

DIY Aquarium Planter

I decided to create my own aquarium planter. This is basically a simple 2Liter bottle that sits on top of the aquarium as a planter. The plant receives water and nutrients from the established aquarium and gets its light and such from above the aquarium.

What you'll need...

Scissors
1, 2Liter Plastic Bottle with Cap (you can add more if you want)
Drill
1inch thick piece of Wood/Glass/Hard Plastic (this will act as your aquarium lid)
Plant/s
Aquarium Silicon (or adhesive of your choosing)
Aquarium filled with water (and other living inhabitants)

Step 1: Cut your 2Liter bottle in half or at an angle (like the above image). You can choose to discard the base at this time or keep it to support the top half of the bottle until the unit is complete.
Step 2: Using a thick piece of Wood/Glass/Plastic (your choice as long as it can sit on top your tank), drill a hole that will fit your bottle cap. You'll also want to drill a small hole in the top of your bottle cap (this will allow the roots to be pulled through the base later).
Step 3: Apply the Aquarium Silicon (or adhesive of your choice) inside the drilled hole in your Wood/Glass/Plastic. With the cap screwed tightly onto the top half of your bottle you'll than push it into your drilled hole with the adhesive in the Wood/Glass/Plastic. Be sure to position the top half of the bottle the way you want your planter to be displayed later once the adhesive has dried completely.
Step 4: Once the adhesive is dry you can than choose to unscrew the bottle from your Wood/Glass/Plastic and the cap should stay securely inside the Wood/Glass/Plastic hole. This will help if you ever want to clean out your planter later on.
Step 5: You can then add your plant into the top of the 2Liter bottle, make sure it is screwed securely back in place on your Wood/Glass/Plastic. Be sure the roots have been pulled through your unit and can reach the water in the aquarium.

Note: You don't need the tank lid to be as wide as the tank so long as it can rest safely on top the tank length wise. You could also make a hinged door that can be lifted up to feed your fish if you do decide to cover the entire top of the aquarium. Or even create a box type hood where you could attach lighting underneath for an all around planted or lighted aquarium.

5.31.2011

DIY Hairgrass Tutorial

Click to Enlarge
I haven't done this yet but I got the idea that hairgrass looks much like string up-close and thus thought this would be a neat idea after seeing the photo's of live hairgrass in the above aquarium.

What you'll need...

Flat Slate
Cotton or Nylon Sewing String (preferably 2 different shades of grassy green)
Aquarium Silicone
Scissors
Click to Enlarge
Step 1: Hold your slate in one hand.
Step 2: Wrap your string tightly around your slate, the more string you wrap around the fuller your faux hairgrass will look when you're done.
Step 3: Lay your slate on a flat surface with the bottom side up. Using aquarium silicone spread it over-top all the string, this will keep it all in place later. Let the silicone dry, this can take 24-48hrs.
Step 4: Once your silicone has dried you'll then flip your slate over. Take your scissors and cut the string apart down the center.
Step 5: Spread the string open off of the slate.
Step 6: To make your faux hairgrass look more realistic trim the string at different lengths. Rinse thoroughly once complete and place into your aquarium.

10.30.2010

Filtration Idea

I've recently been trying to design my own undergravel filtration system, using that of a regular power filter, the base of an undergravel filter and some clear tubing.

With a normal power filter it doesn't really pick up everything from the bottom of a tank and with a normal undergravel filter setup it has a noisey pump, lacks power in my opinion and lacks filtration.

By removing the tube from the power filter and the undergravel filter and connecting one end of clear tubing to each device (trimming the tubing to fit) I now will have created a filtration system which actually filters out under gravel debri, provides filtration and carbon through the power filter and you won't have anything that takes away from the natural beauty of your fish tank as you do with most power filters.

I have yet to assemble this idea yet but if you've tried it or you have similar modification expericienes I'd love to hear about them!